Delete Salesforce Records
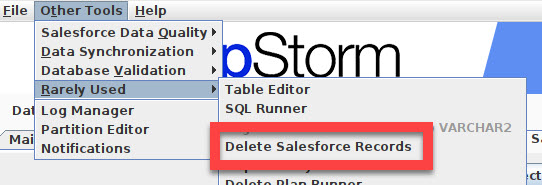
To access the Delete Salesforce Records tool:
- Select “Other Tools” from the top-level menu.
- Select “Rarely Used” and then “Delete Salesforce Records”
Understanding the consequences of deleting a hierarchy of records and even performing a hierarchical delete are difficult problems. Examples:
- What records will be deleted in Salesforce as a side effect if I delete the ACME account?
- Delete the following set of old Emails AND all of their related records.
The Delete Salesforce Records tool minimizes the effort required to understand, generate audit trails, and execute hierarchical type deletions.
The general flow of the Delete Salesforce Records tool is fairly simple.
- Select a Salesforce object as the root object for deletion (e.g. Account.)
- Use a record selector to identify top level records of this root object to delete.
- Optionally explore the records that will be deleted.
- Delete the selected records and all children using one of the following techniques:
- Generate Data Loader files which can be use to manually delete records.
- Generate a Python script which, when run, will delete the records.
- Delete the records immediately using API calls to Salesforce.
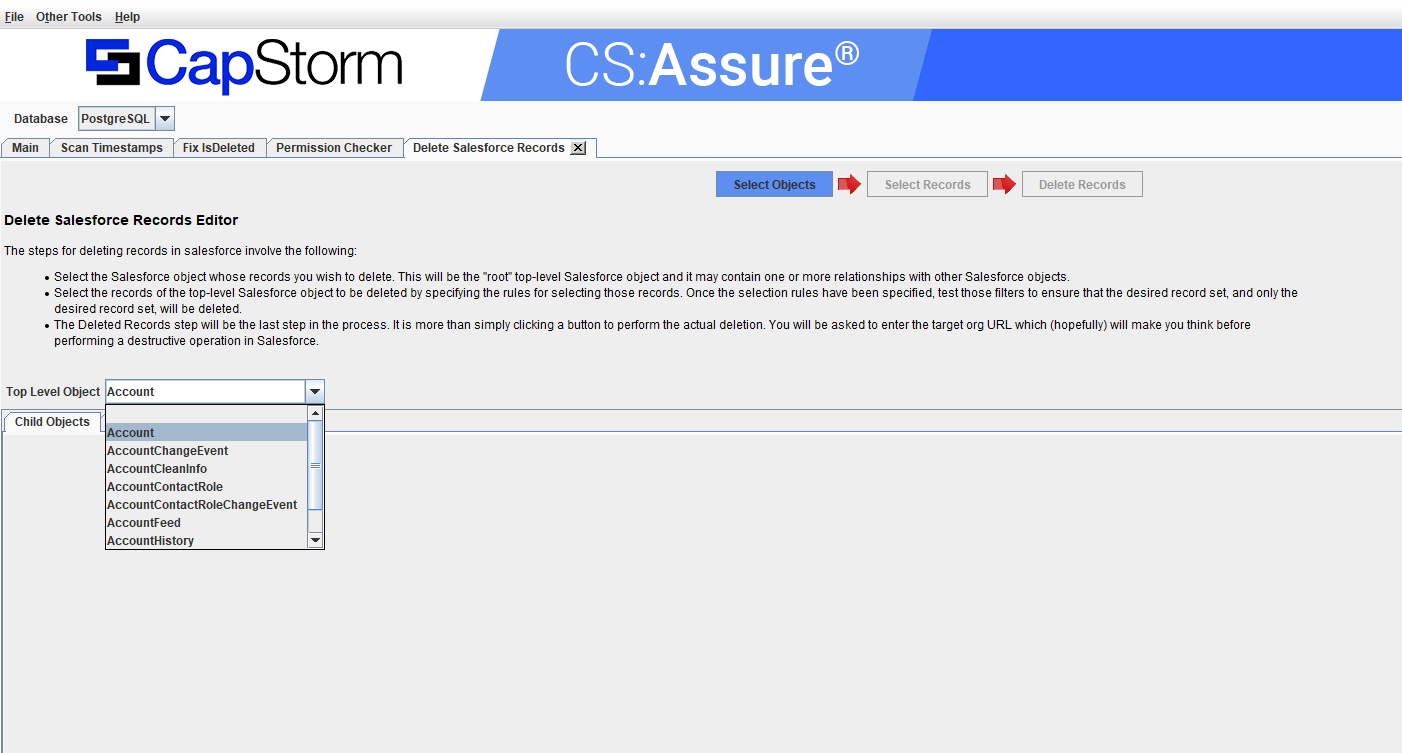
The following sample screen shot illustrates that the Account Salesforce object is being selected.
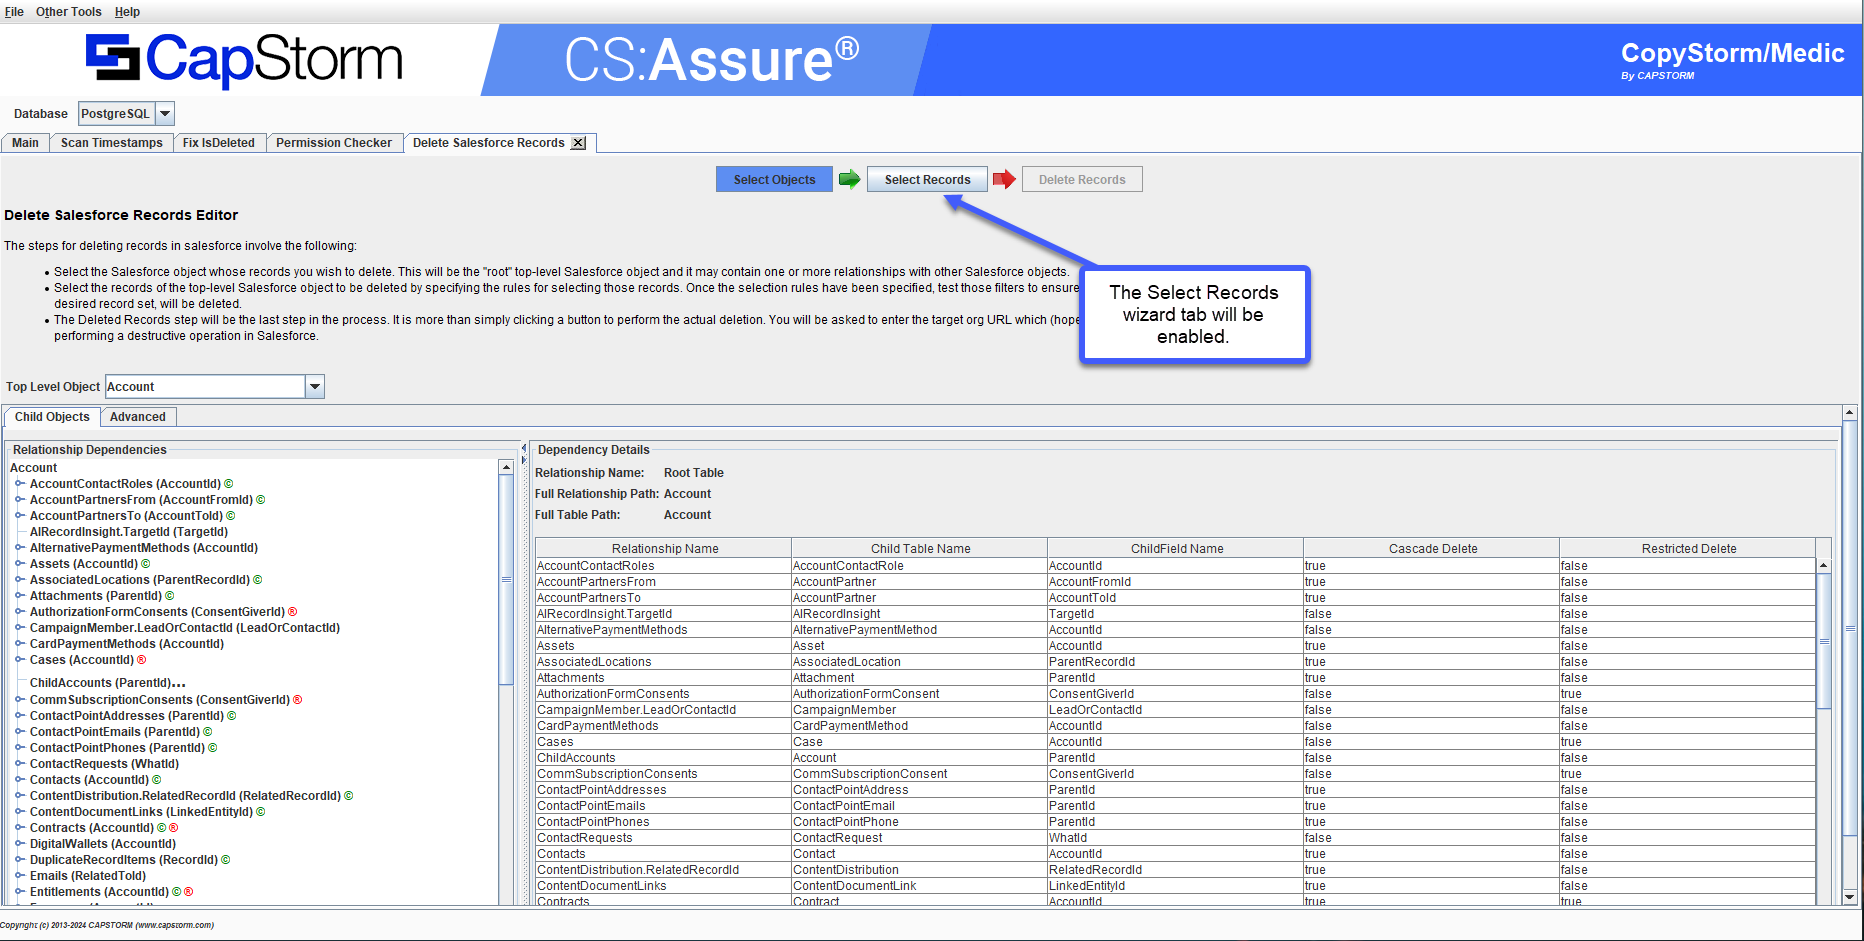
Once you have selected your Salesforce root object, you will be prompted to allow loading the relationship data for that object. This process may take a few seconds to complete. Upon completion you will be presented with a screen that shows these relationship details and the Select Records wizard tab at the top will be enabled.
Dependency Plans
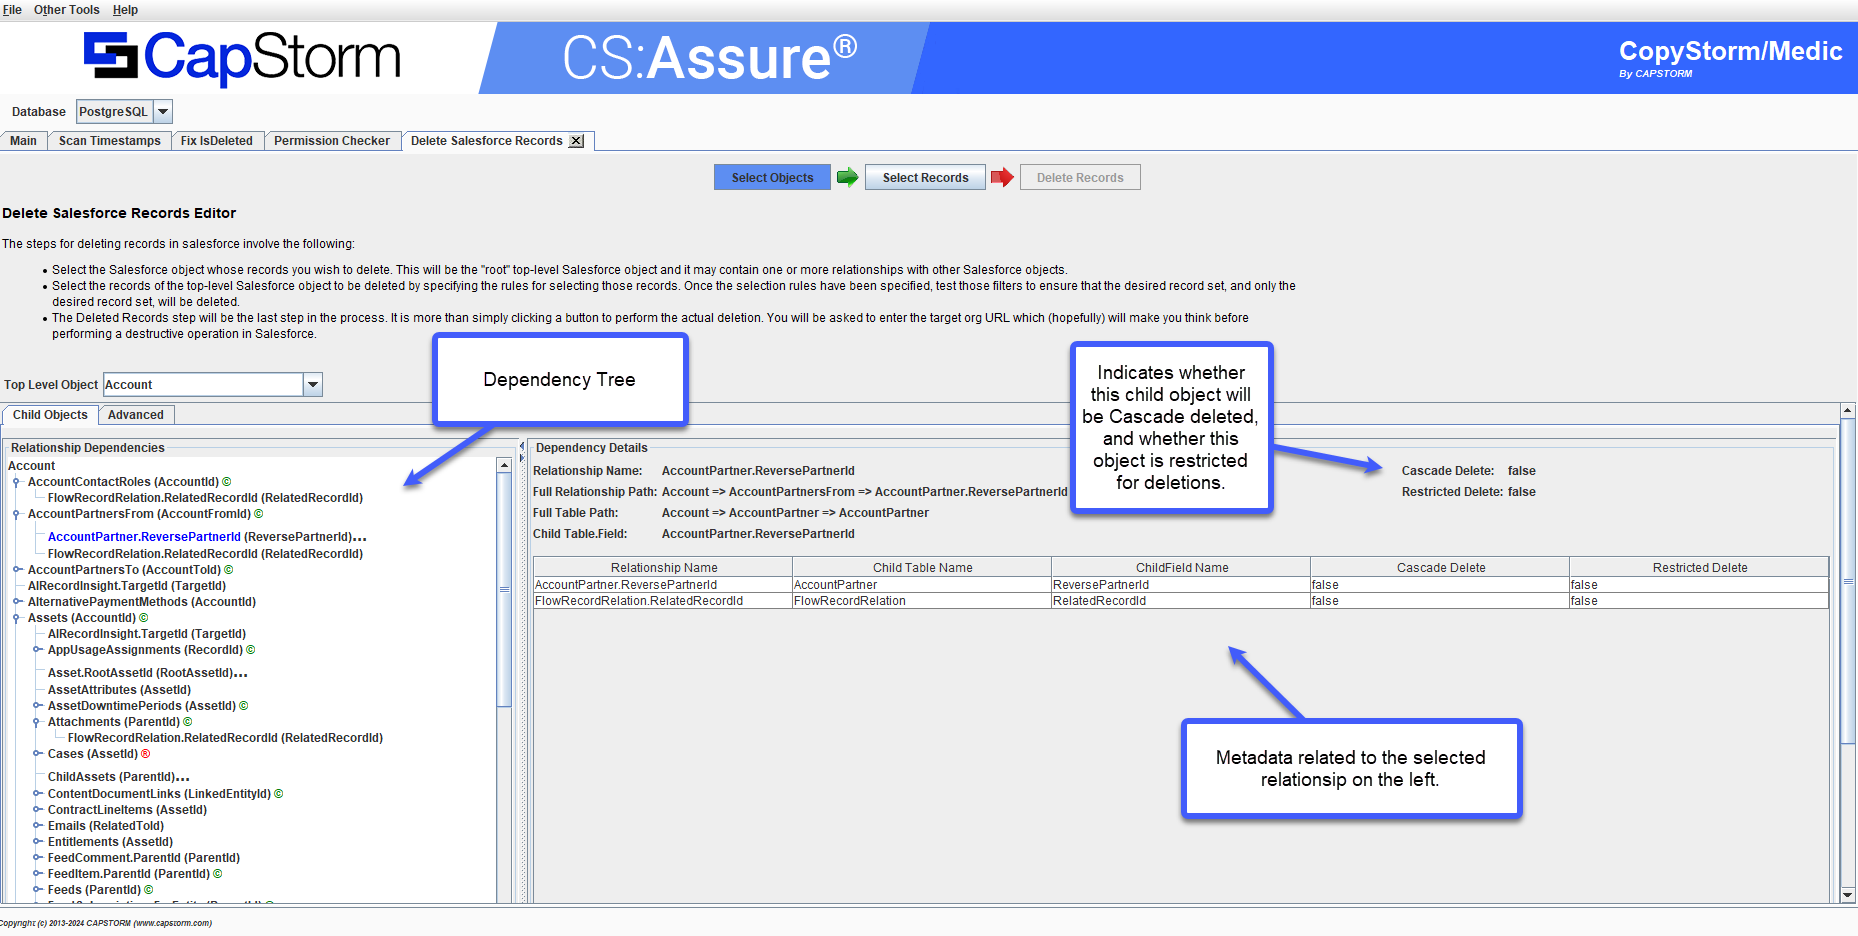
In the screen shot above the left side of the relationships panel is a tree structure that represents the hierarchy of Salesforce relationship (or dependency) objects on the Salesforce root object that was selected earlier (Account in this example.) Throughout this document we will be making reference to this Dependency Plan, and in the current implementation of the Delete Salesforce Records tool, there is only one root Salesforce object for that plan. The terms relationship and dependency are interchangeable.
In this case the dependency plan is used to define rules for Salesforce record deletion. As one selects objects from the left-side dependency hierarchy tree, the dependency objects on that selection will appear on the right side along with some important metadata, as shown in the screen shot below.
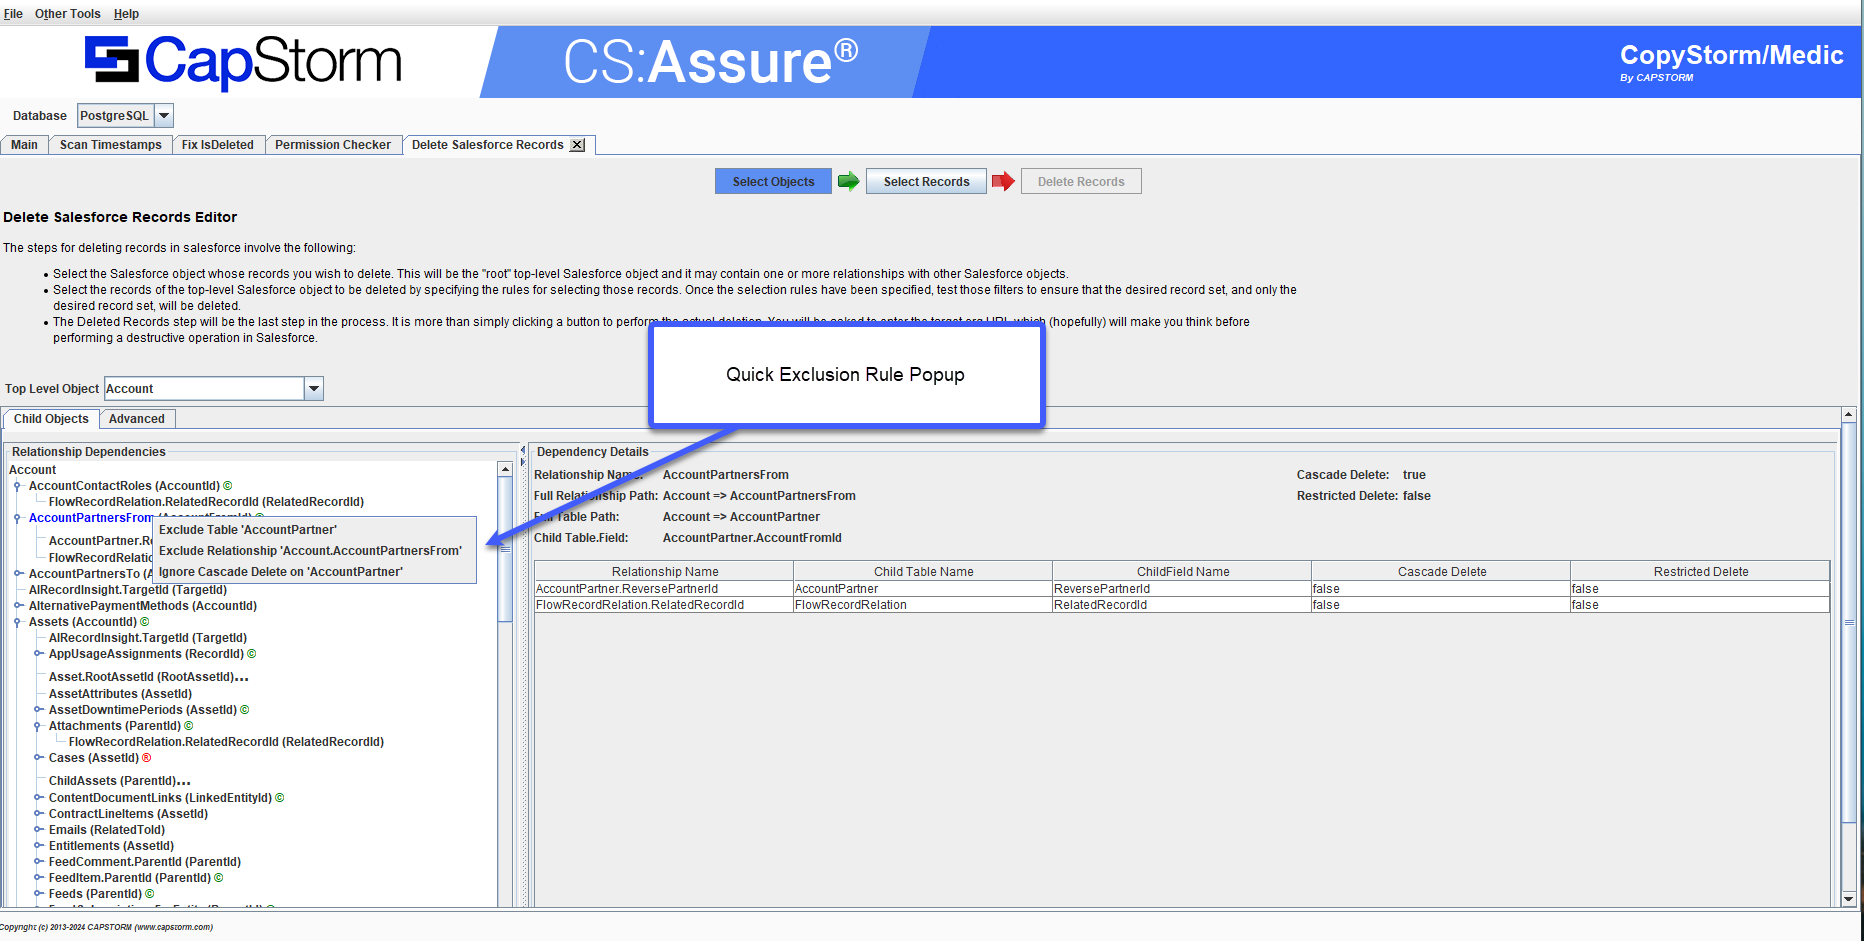
There are various ways in which rules can be applied surgically on each relationship object. One quick means is to right click on a relationship on the left side hierarchy tree and observe that a pop-up menu will be presented to the user, allowing for adding an exclusion rule, and possibly overriding the Cascade delete setting, as depicted in the screen shot below:
Selecting Records to Delete
Once a specific Salesforce object has been selected, the Salesforce Ids of the top level records to be deleted must be specified. This is done using a Record Selector.
There are four ways to select top level record ids.
Snapshot
The Snapshot record selector uses a previously created CopyStorm Snapshot to determine which records are candidates for deletion. When this option is selected the only deletion candidates that can occur are those that are both in the specified snapshot AND are in the selected Salesforce object table.
SOQL
The SOQL record selector expects a SOQL statement which returns top level records Ids. For example, if the selected Salesforce root object is the Account object then any of the following SOQL statements would work.
- SELECT Id FROM Account WHERE name=’ACME’
- SELECT AccountId FROM Opportunity WHERE ShippingCountry=’Canada’
Id List
The Id List record selector expects a text block containing top level set of record ids. A space or comma can be used to separate record ids. This is a useful selector when only a few top level records need to be deleted.
File
The File record selector expects a text file with one Salesforce Id per line.
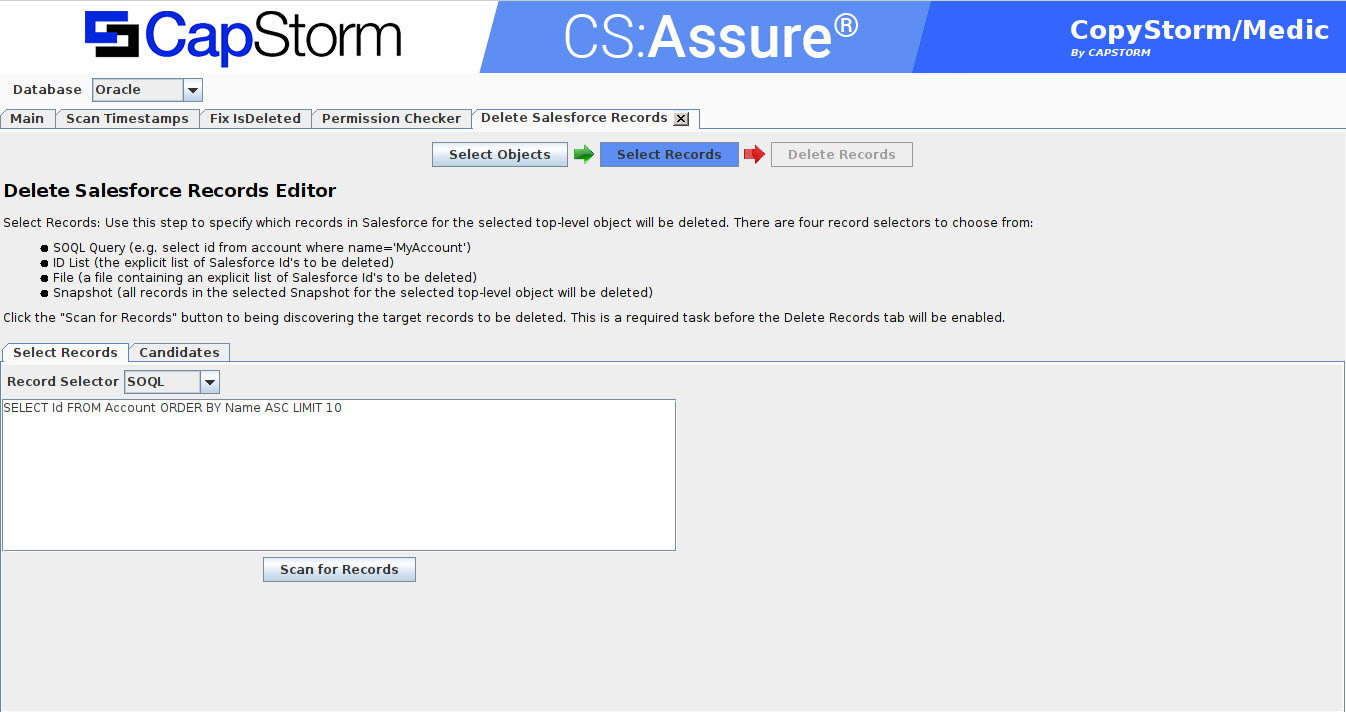
Once a Record Selector has been entered, click on the Scan for Records button to find all related records.
The following example screenshot used a SOQL record selector to specify which records will be deleted.
Understanding Deletion Candidates
Though it is possible at this point to start deleting records, it is often advisable to inspect the deletion candidates first. There are two clean ways to visualize what records will be deleted.
- Clicking on a candidate table will cause its related deletion candidate records to be display on the right side of the display.
- Generate a HTML report which show details about each record that will be deleted. This report can be useful as as audit trail.
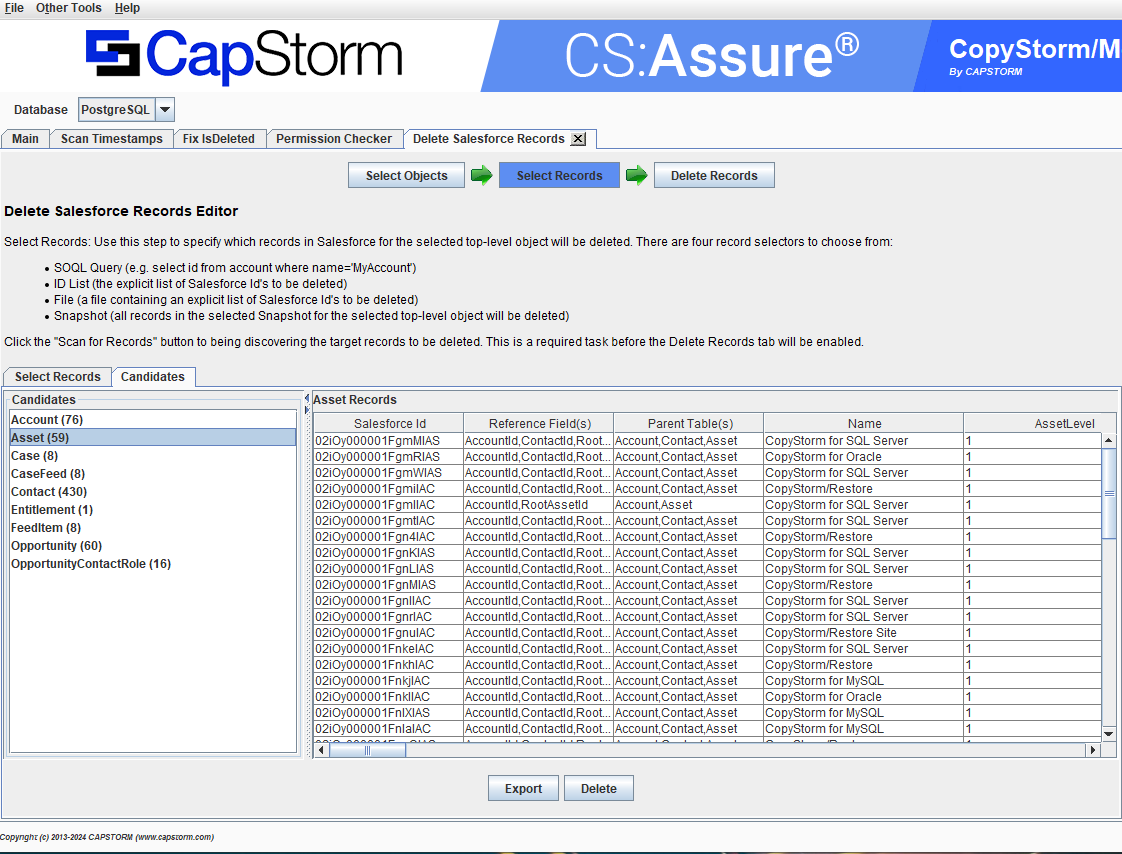
Clicking on a candidate table causes a table with the following columns to be displayed.
- Salesforce Id — the Salesforce Id of the record to be deleted.
- Reference Field(s) — the name of fields in the record which point to other tables also in the deletion set.
- Parent Table(s) — the name of each table the reference fields in the record are pointing to.
In the following screen shot, the first Asset record in the list was included because:
- Three of its reference fields point to other tables in the deletion set (AccountId, ContactId, and RootAssetId)
- The tables the three reference fields are pointing to are Account, Contact, and Asset.
For a complete audit trail and dependency details, the Export button is a good option
Exporting Records
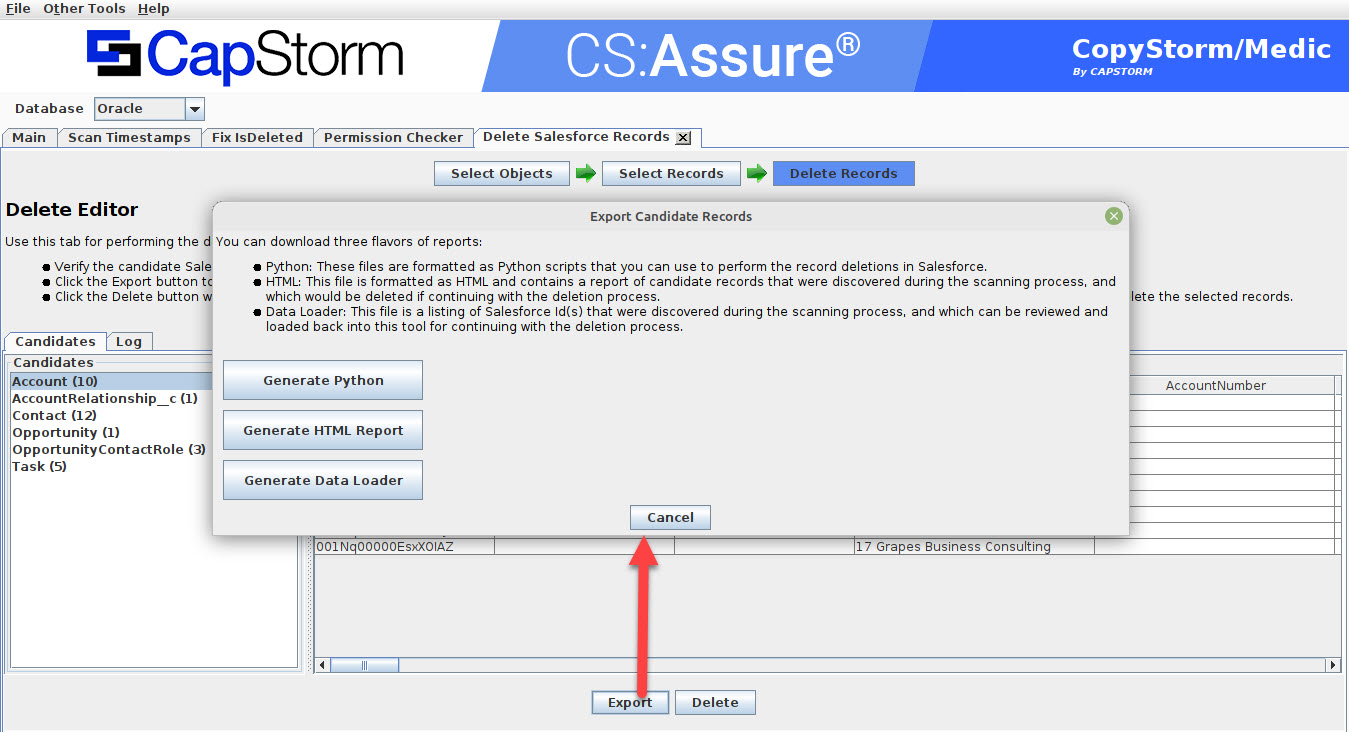
To export deletion candidates, click on the “Export” button.
Generating a HTML Report
To export a single-file HTML Report containing all of the record Ids that are marked to be deleted, click on the Generate HTML Report button.
The HTML report will include Record Ids and dependency information detailing why each individual record is included in the deletion plan.
Generating Data Loader Files
To generate Data Load files click on the Generate Data Loader button and enter a output directory when prompted. The system will generate a series of 1 column text files where:
- The only column in each file is a Salesforce Record Id.
- Each file will be prefixed with a four digit number which indicates the order in which it should processed by Salesforce.
For example, the data loader files generated for the example is this document are:
#
# Record Deletion Plan Account
# Generated Mon Sep 18 10:48:07 CDT 2023
# Output Dir /home/greg/tmp/unittest
#
# The following files should be deleted from Salesforce in order.
#

0001CaseComment.txt
0002OpportunityContactRole.txt
0003QuoteLineItem.txt
0004OpportunityLineItem.txt
0005CaseFeed.txt
0006OpportunityFeed.txt
0007Case.txt
0008FeedItem.txt
0009Task.txt
0010AccountRelationship__c.txt
0011Quote.txt
0012Opportunity.txt
0013Asset.txt
0014Contact.txt
0015Account.txt
#
#
# End of Data Loader File Plan Account
#
Generating Python
To generate a Python script which uses the CapStorm SQLForce library to delete records, click on the Generate Python button and enter an output directory when prompted. The system will generate a main python script and a directory of data files. Running the generated script will delete records from Salesforce.
Deleting Records
The final step is to delete records from Salesforce using one of the following techniques.
- Generate Data Loader files which can be use to manually delete records.
- Generate a Python script which, when run, will delete the records.
- Delete the records immediately using API calls to Salesforce.
Deleting Records Immediately
Clicking on the Delete button will prompt a user for confirmation and the rapidly start delete records from Salesforce. Before beginning the deletion, the confirmation dialog requires you to enter the Salesforce Org URL for the target Salesforce.
- The Salesforce Org URL (which appears as a somewhat randomly generated phrase) must be typed in by hand.
- If the deletion target is a production Salesforce instance then a checkbox must be selected.
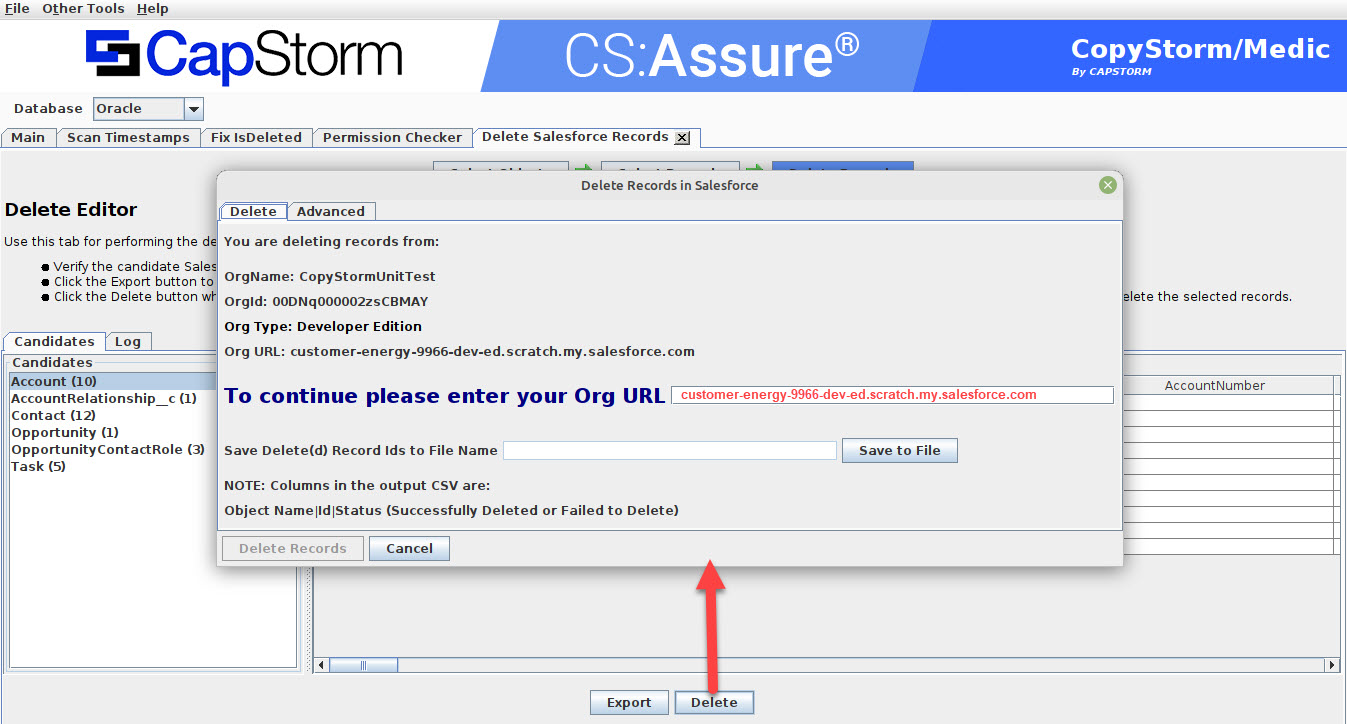
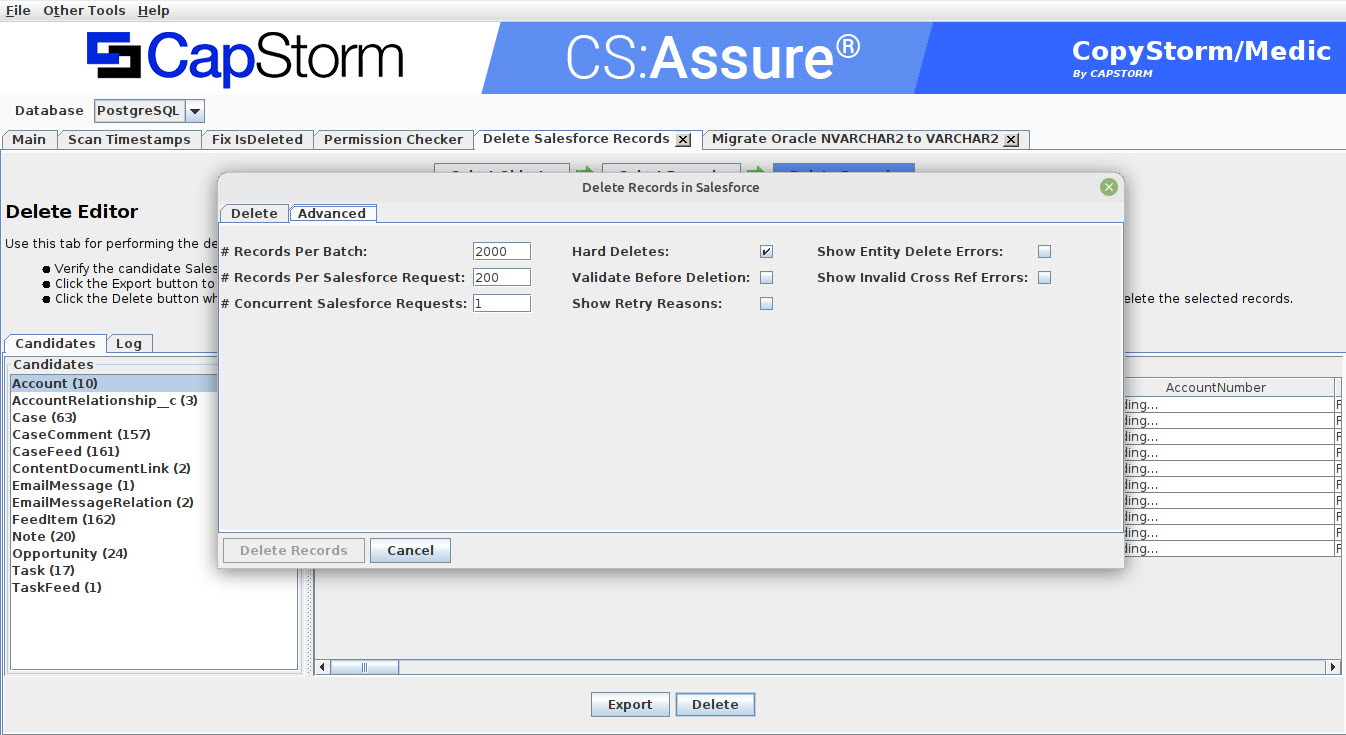
In addition, the Advanced tab contains a number of deletion process parameters that can be set. These include:
- # Records Per Batch: This is the maximum number of records to process concurrently.
- # Records Per Salesforce Request: The maximum number of records in a single API call to Salesforce. The maximum and recommended value is 200.
- # Concurrent Salesforce Requests: The maximum number of concurrent delete requests to send to Salesforce. This number largely determines the speed of the overall delete process.
- Hard Delete: If checked, hard deletes will be performed in Salesforce.
- Validate Before Deletion: If checked, the system will validate that a record is still in Salesforce before a delete request is made.
- Show Retry Reasons: If checked, and a deletion on a record fails and the system reattempts to perform the delete then display the retry reason. A common retry reason is record locking which is solved by temporarily reducing parallelism.
- Show Entity Delete Errors: If checked, display an error if a attempt is make to delete a record which is already deleted.
- Show Invalid Cross Reference Error: If checked, display an error on an INVALID CROSS REFERENCE Salesforce error.
