Setting Up Salesforce For Authentication
In order to login to the CapStorm/Container using Salesforce, you will first need to set up a connected app in your Salesforce org. This connected org will need to have OAuth Settings enabled along with a handful of other settings. This article walks through each step required to create a Salesforce Connected App that can be used to enable Salesforce authentication in the CapStorm/Container. For more information on setting up Connected Apps in Salesforce, please visit Salesforce’s official documentation.
Note: the screenshots and instructions in this page use sample values for a number of parameters.
- http://localhost:8080 is the host/port used for the CapStorm/Container.
- You will need to use the host and port values that are applicable to your environment.
- Your values for the host, port, and protocol should be used for the Callback URL parameter and the Start URL parameter.
- The Connected App Name and contact details should be changed to reflect proper values for your organization.
Steps to Setup the Connected App
- Login to Salesforce and go to Setup
- In the Quick-Find search bar, type App Manager and select it
- In the top right, click New Connected App
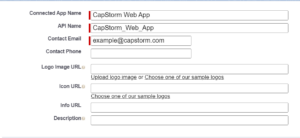
- Enter a name for the app in the Connected App Name field
- The API name will auto-fill when you click enter
- Note: This name can be anything you’d like
- Add a Contact Email
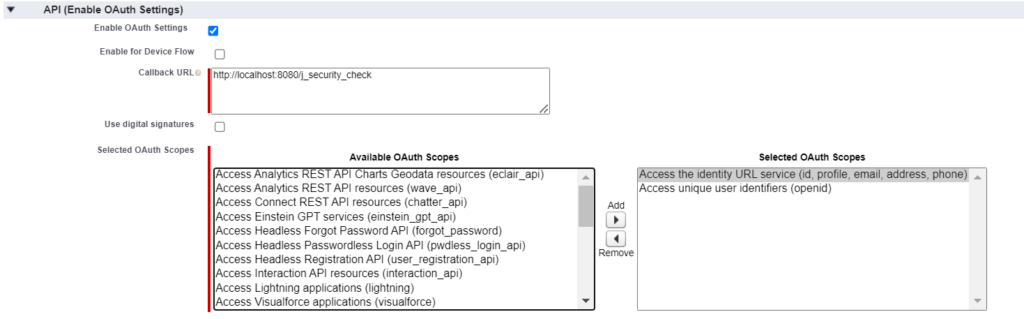
- In the API (Enable OAuth Settings) section, select Enable OAuth Settings
- In the Callback URL box, enter http://localhost:8080/j_security_check
- For the Selected OAuth Scopes, add the below scopes
- Access the identity URL service (id,profile,email,address,phone)
- Access unique user identifiers (openid)
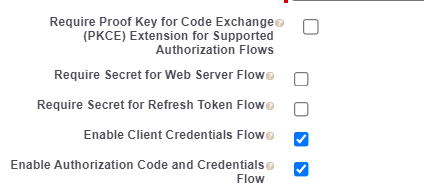
- Disable the below settings
- Require Proof Key for Code Exchange (PKCE) Extension for Supported Authorization Flows
- Require Secret for Web Server Flow
- Require Secret for Refresh Token Flow
- Enable the below settings
- Enable Authorization Code and Credentials Flow
- Enable Token Exchange Flow
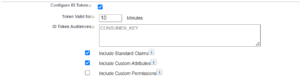
- Enable Configure ID Token
- Set Token Valid for to 10 Minutes
- Select Include Standard Claims and Include Custom Attributes
- Under Web App Settings, enter http://localhost:8080 next to Start URL
- Click Save
- In the API (Enable OAuth Settings) section, click the Manage Consumer Details button
- Note the Consumer Key and the Consumer Secret; You will need these for setup in the application.
- Consumer Key = OIDC_CLIENT_ID
- Consumer Secret = OIDC_CLIENT_SECRET